
Registering on the Higher Education Financing (HEF) Portal is an important step for students who want to access higher education funding opportunities in Kenya. Before you can apply for the relevant funding, you need to create an account on the HEF Portal and provide the required personal and contact information.
In this guide, you will learn how to create your HEF Portal account, enter your details correctly, and complete the registration process. We also explain the key steps to follow after creating your account so you can proceed to access the available HEF services and applications.
READ ALSO: How To Reset HEF Portal Password
What is HEF Portal?
HEF Portal is an online platform provided for students to access and manage their Higher Education Financing information and services. Through the portal, students can access their HEF account and view information related to their education financing, including their HELB loans, loan history, loan disbursement information, compliance certificates, and other services available through the student portal.
HEF Portal can be accessed online at https://portal.hef.co.ke/. To access your account, you can enter the Email Address or ID Number linked to your HEF Students Portal account together with your HEF Account Password. After successfully logging in, you can access the HEF Students Portal Dashboard and use options such as My Loans and Self Serve to access the available services and information associated with your account.
What is HEF Portal Registration?
HEF Portal Registration is the process of creating an account on the Higher Education Financing (HEF) Portal. It allows students to provide their personal and contact information, create their account details, and gain access to the online services available through the HEF Students Portal.
Once the registration process is completed successfully, students can log in to their HEF Portal accounts using their registered email address or ID number and password. The account provides access to services and information related to higher education financing, including HELB loan information, loan history, disbursement details, compliance certificates, and other available student services.
Requirements Needed To Register on HEF Portal
Before you begin the HEF Portal registration process, it is important to have the necessary information and details readily available. Having these requirements prepared in advance will make it easier to complete the registration correctly and avoid interruptions while creating your account. The three requirements needed to register on the HEF Portal are:
- ID Number
- Email Address
- Phone Number
Students seeking access to higher education funding in Kenya need a registered account on the Higher Education Financing (HEF) Portal to use its online services. The account provides a central place for managing personal details, accessing funding-related applications, and following important information associated with the student’s funding journey. Having the correct information ready during registration can also help ensure that the account is created without unnecessary errors.
How To Register on HEF Portal
Once you have the required information ready, you can proceed with creating your account on the HEF Portal. The registration involves entering your details, setting up your account credentials, and completing the required information before submitting the registration. Follow the steps below to register on HEF Portal:
- Step 1: Visit HEF Portal
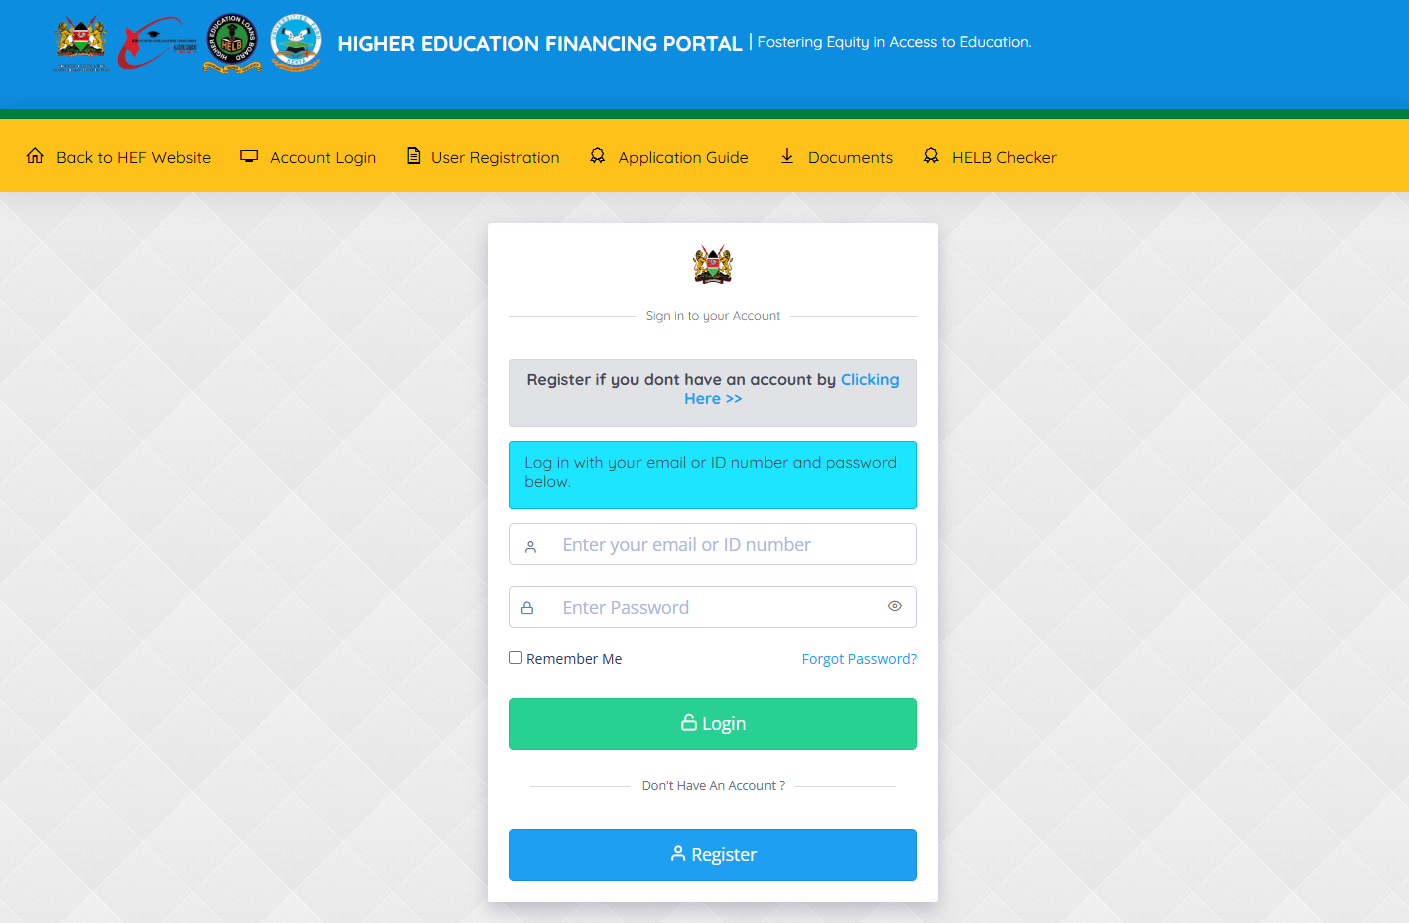
The first step in the process of HEF Portal Registration is to visit HEF Portal using https://portal.hef.co.ke/
- Step 2: Click on Register
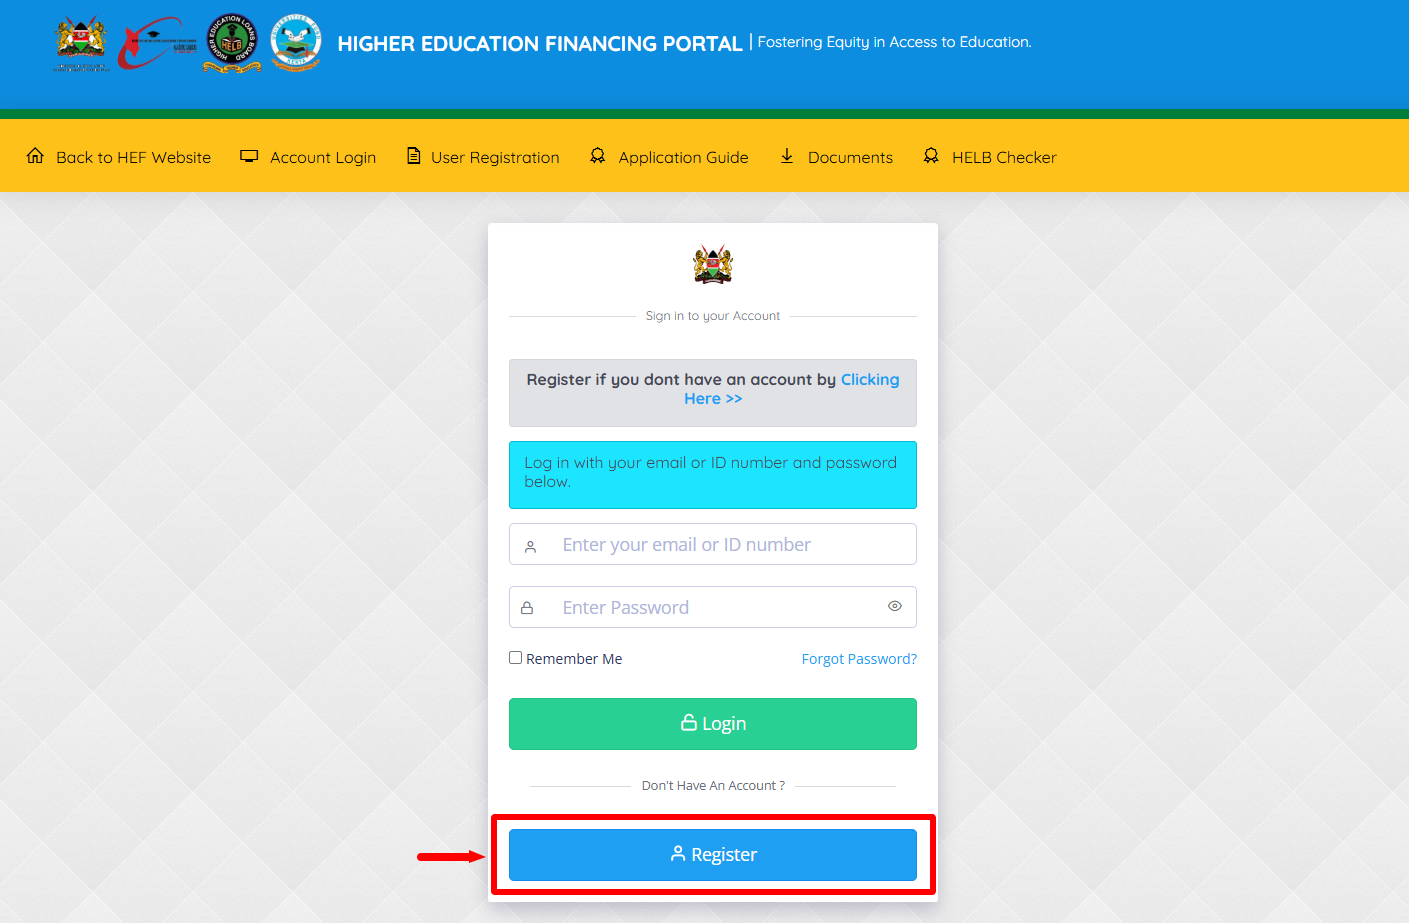
Once you are on HEF Portal, scroll down and click on “Register” button.
- Step 3: Employment Status
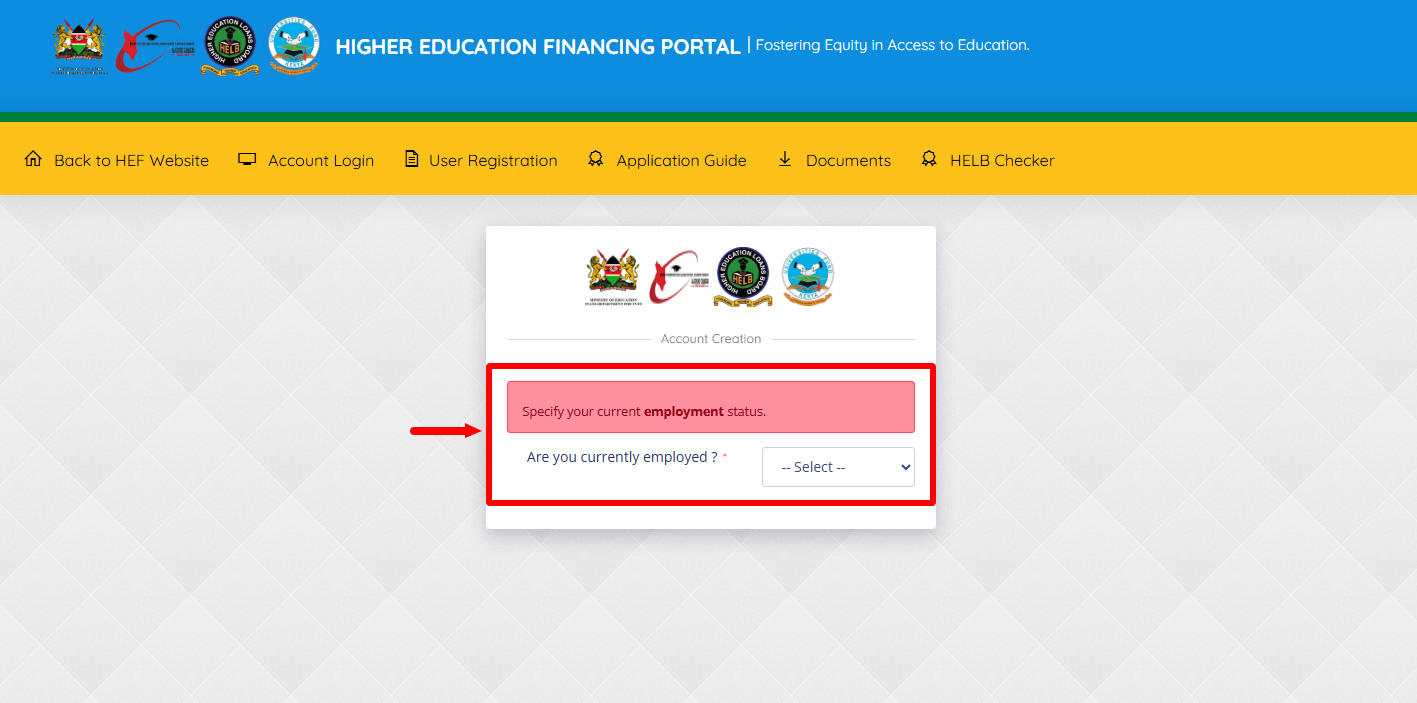
Next, you need to specify your employment status i.e. are you currently employed – “Yes” or “No” are the two choices that you have to select one.
- Step 4: ID Number or Maisha Number
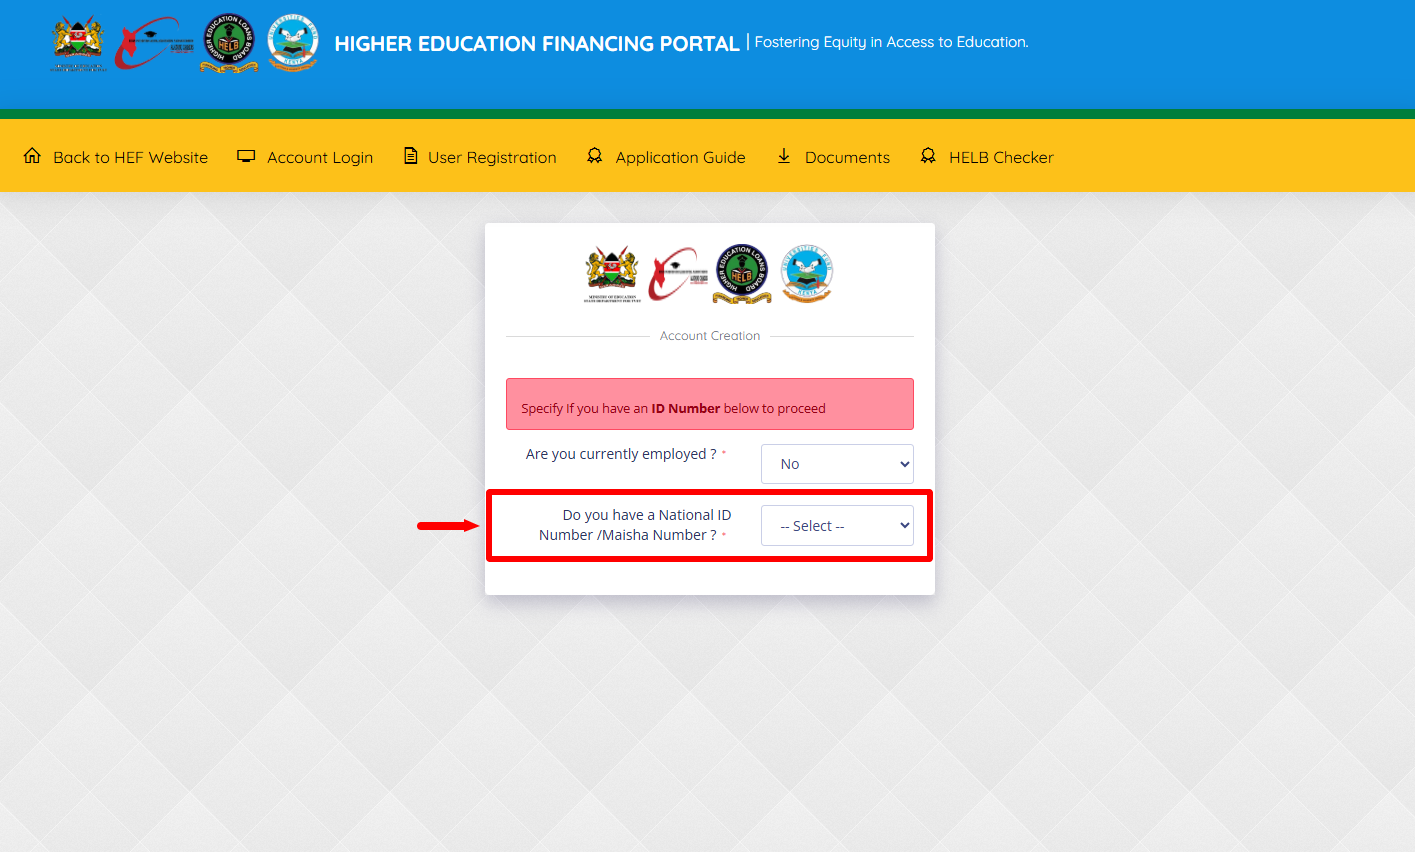
In this step, you need to specify whether you have National ID or Maisha Number. If you have, select “Yes” ad proceed to the next step.
- Step 5: Select Your KCSE Year
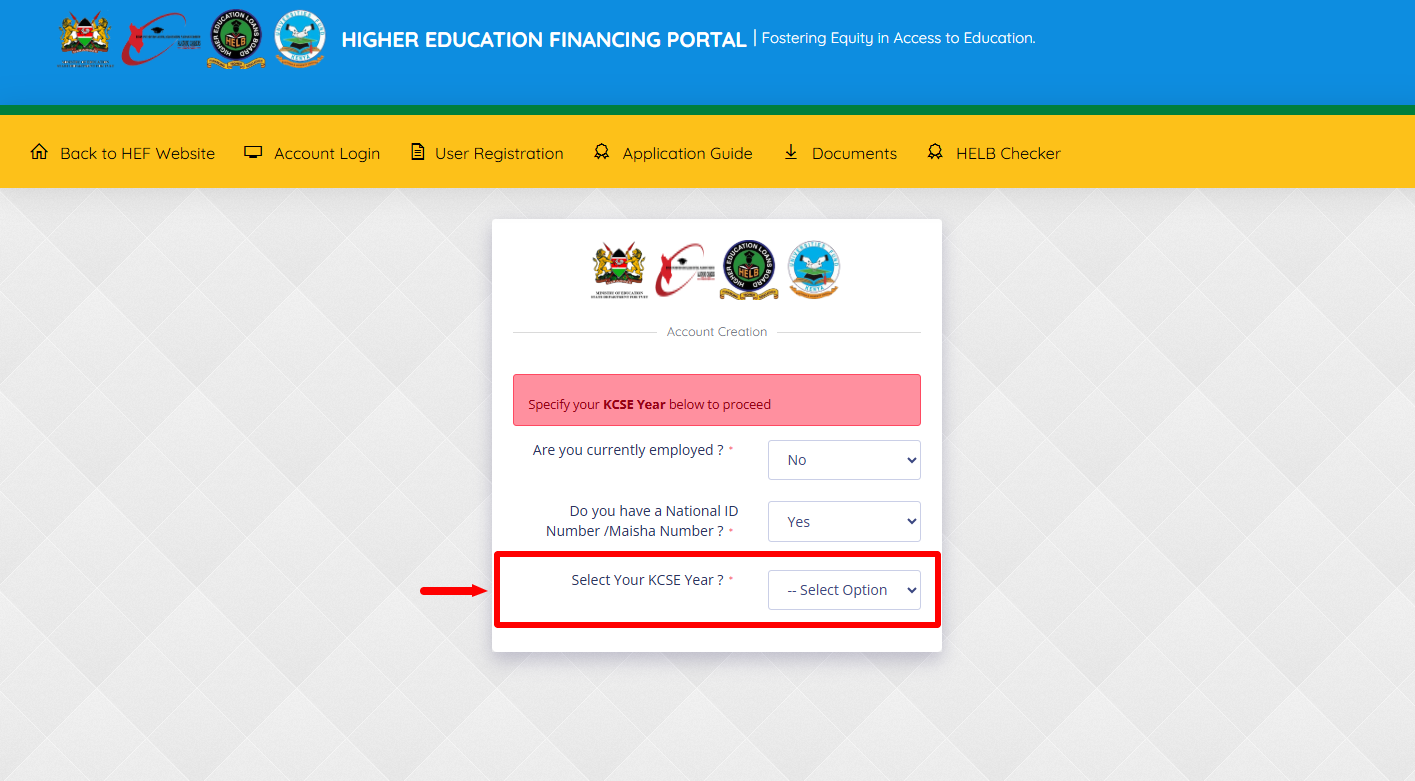
Next, you need to select the year that you did your Kenya Certificate of Secondary Education (KCSE). Take note that if you did your KCSE between 2022 to 2025, you will be required to enter your KCSE index number in the next step. If you did your KCSE before 2022, you enter ID number and proceed to the next step.
- Step 6: Enter KCSE Index Number
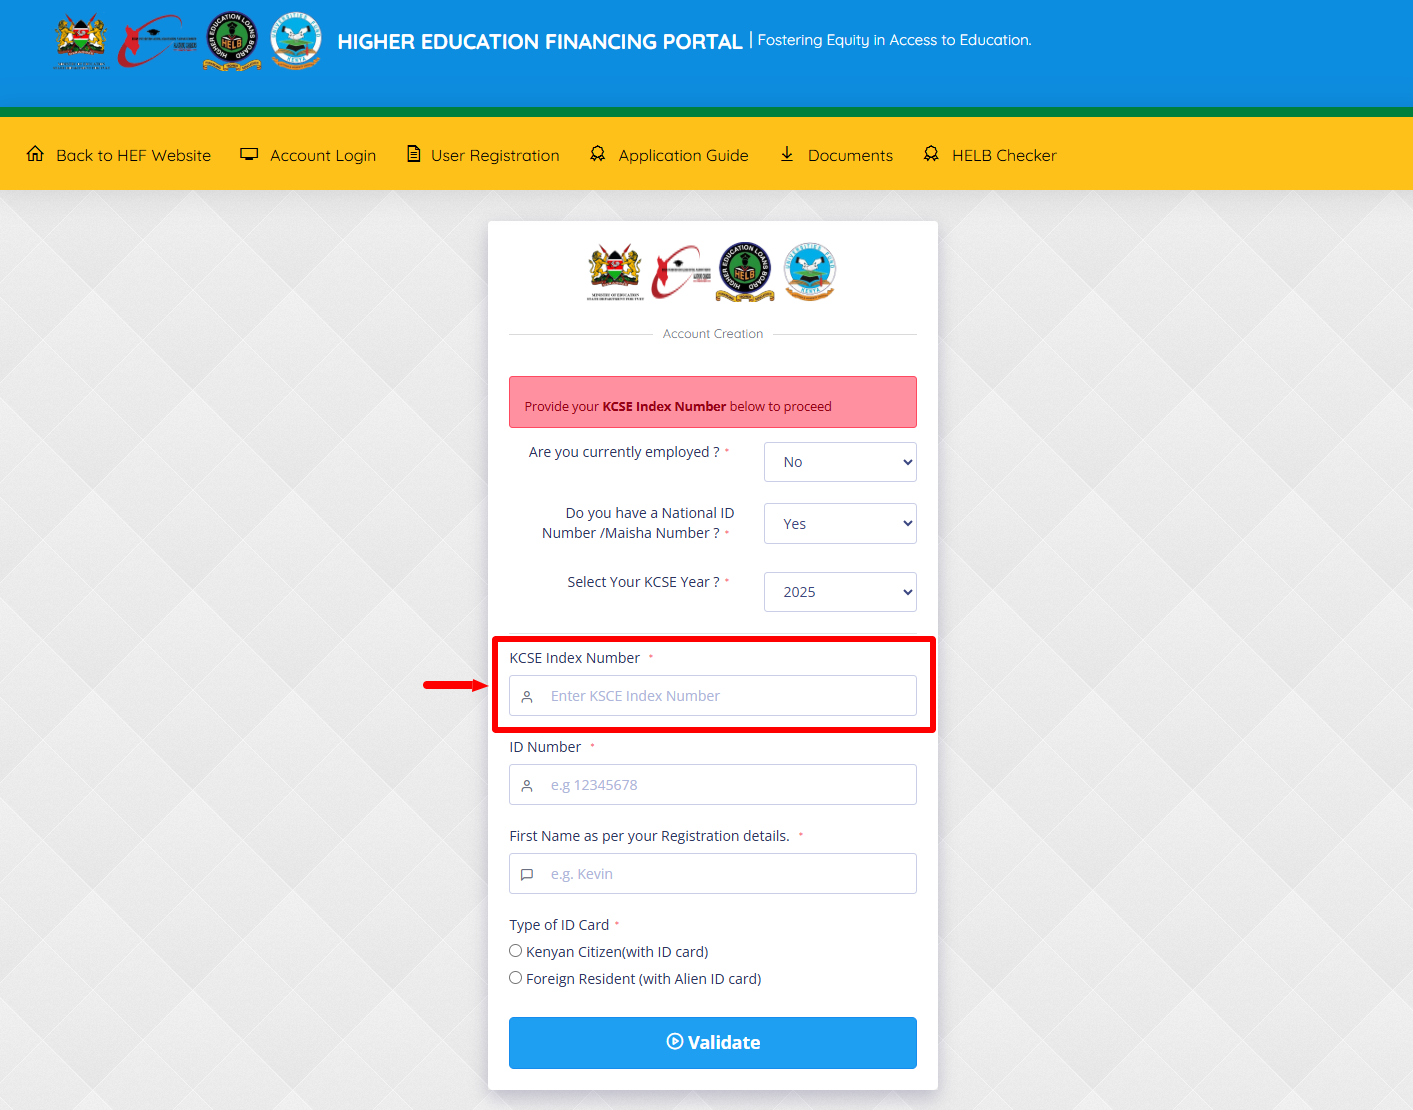
If in the above step you selected your KCSE year from 2022 onwards, you now need to enter your “KCSE Index Number” and then proceed to the next step.
- Step 7: Enter ID Number
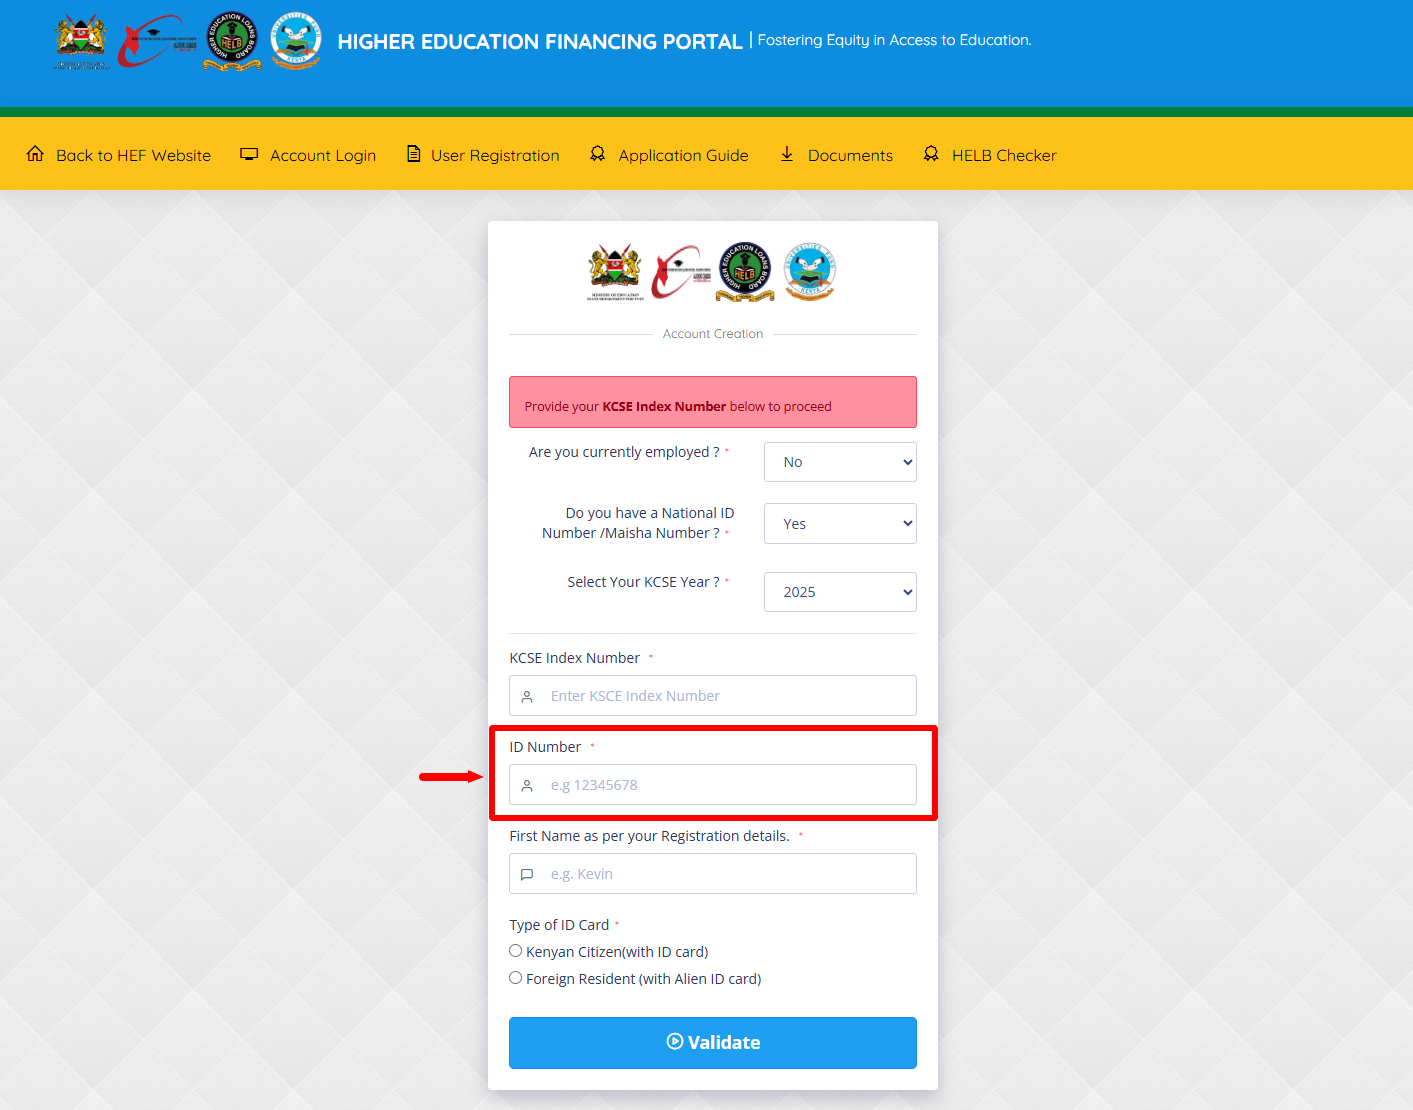
Next, in this step you need to enter your “ID Number” or “Maisha Number” before proceeding to the next step.
- Step 8: Enter First Name
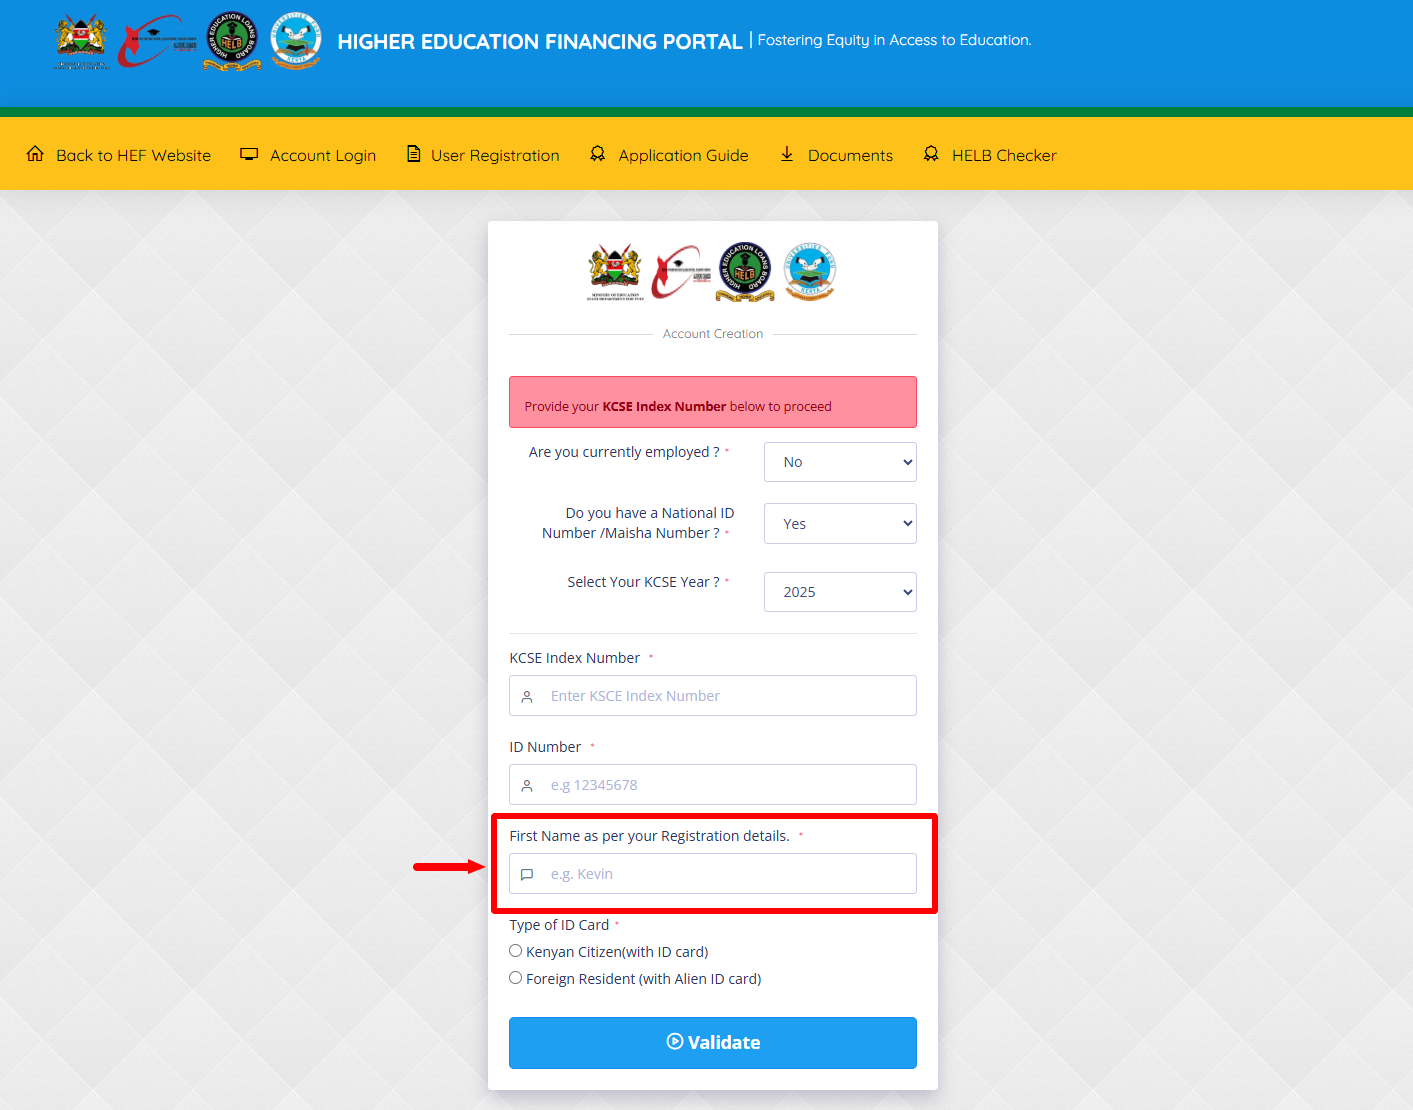
You now need to enter your “First Name” as per your national ID or maisha card (registration document).
- Step 9: Select Type of ID Card
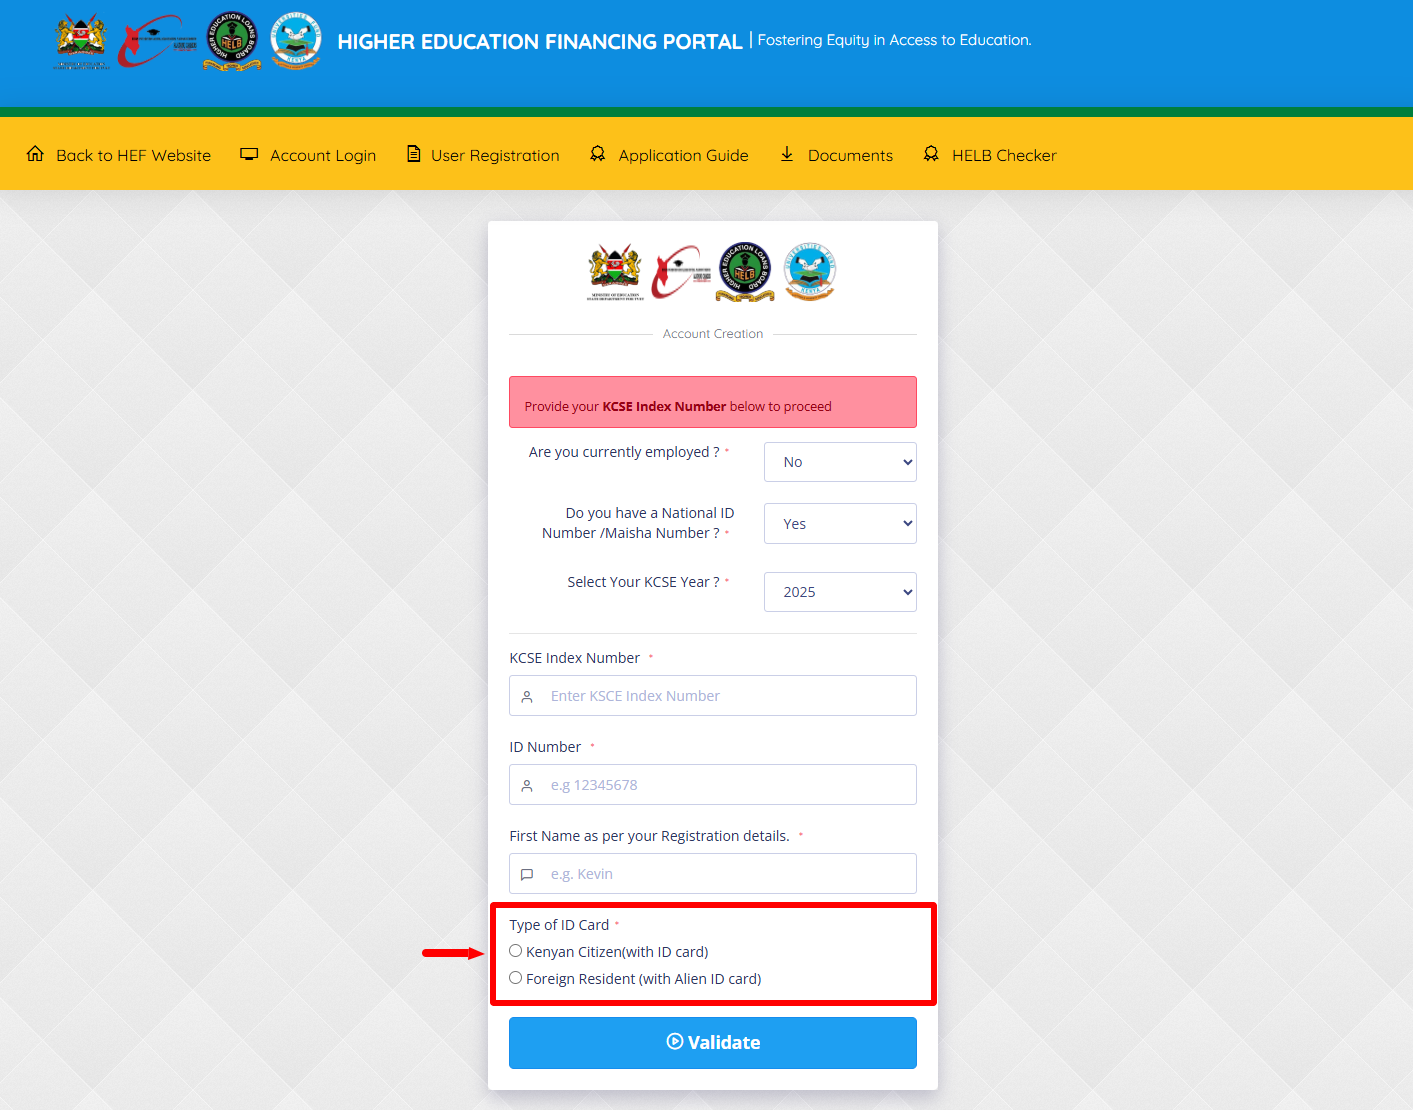
Next, you need to select the type of ID card that you are using for HEF Portal Registration. This can either be “Kenyan citizen (with ID card)” or “Foreign resident (with alien ID card).” Once done, proceed to the next step.
- Step 10: Click on Validate
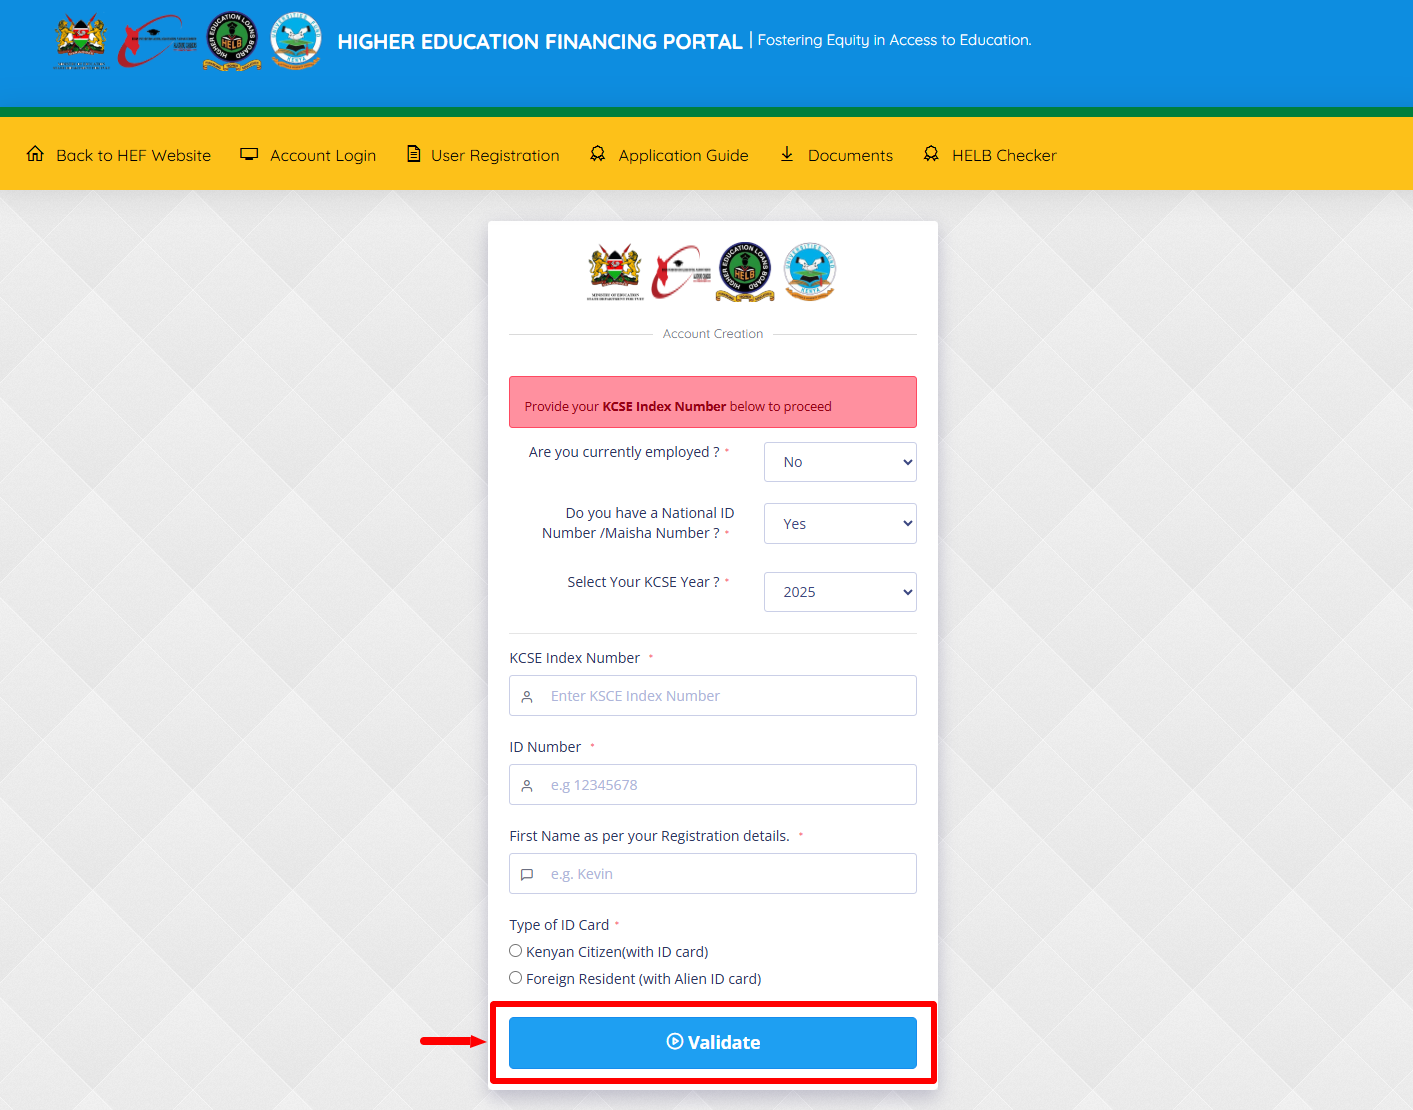
Once you have selected the type of ID card that you want to use for HEF Portal Registration, click on the “Validate” button to validate the details.
- Step 11: Enter Email Address
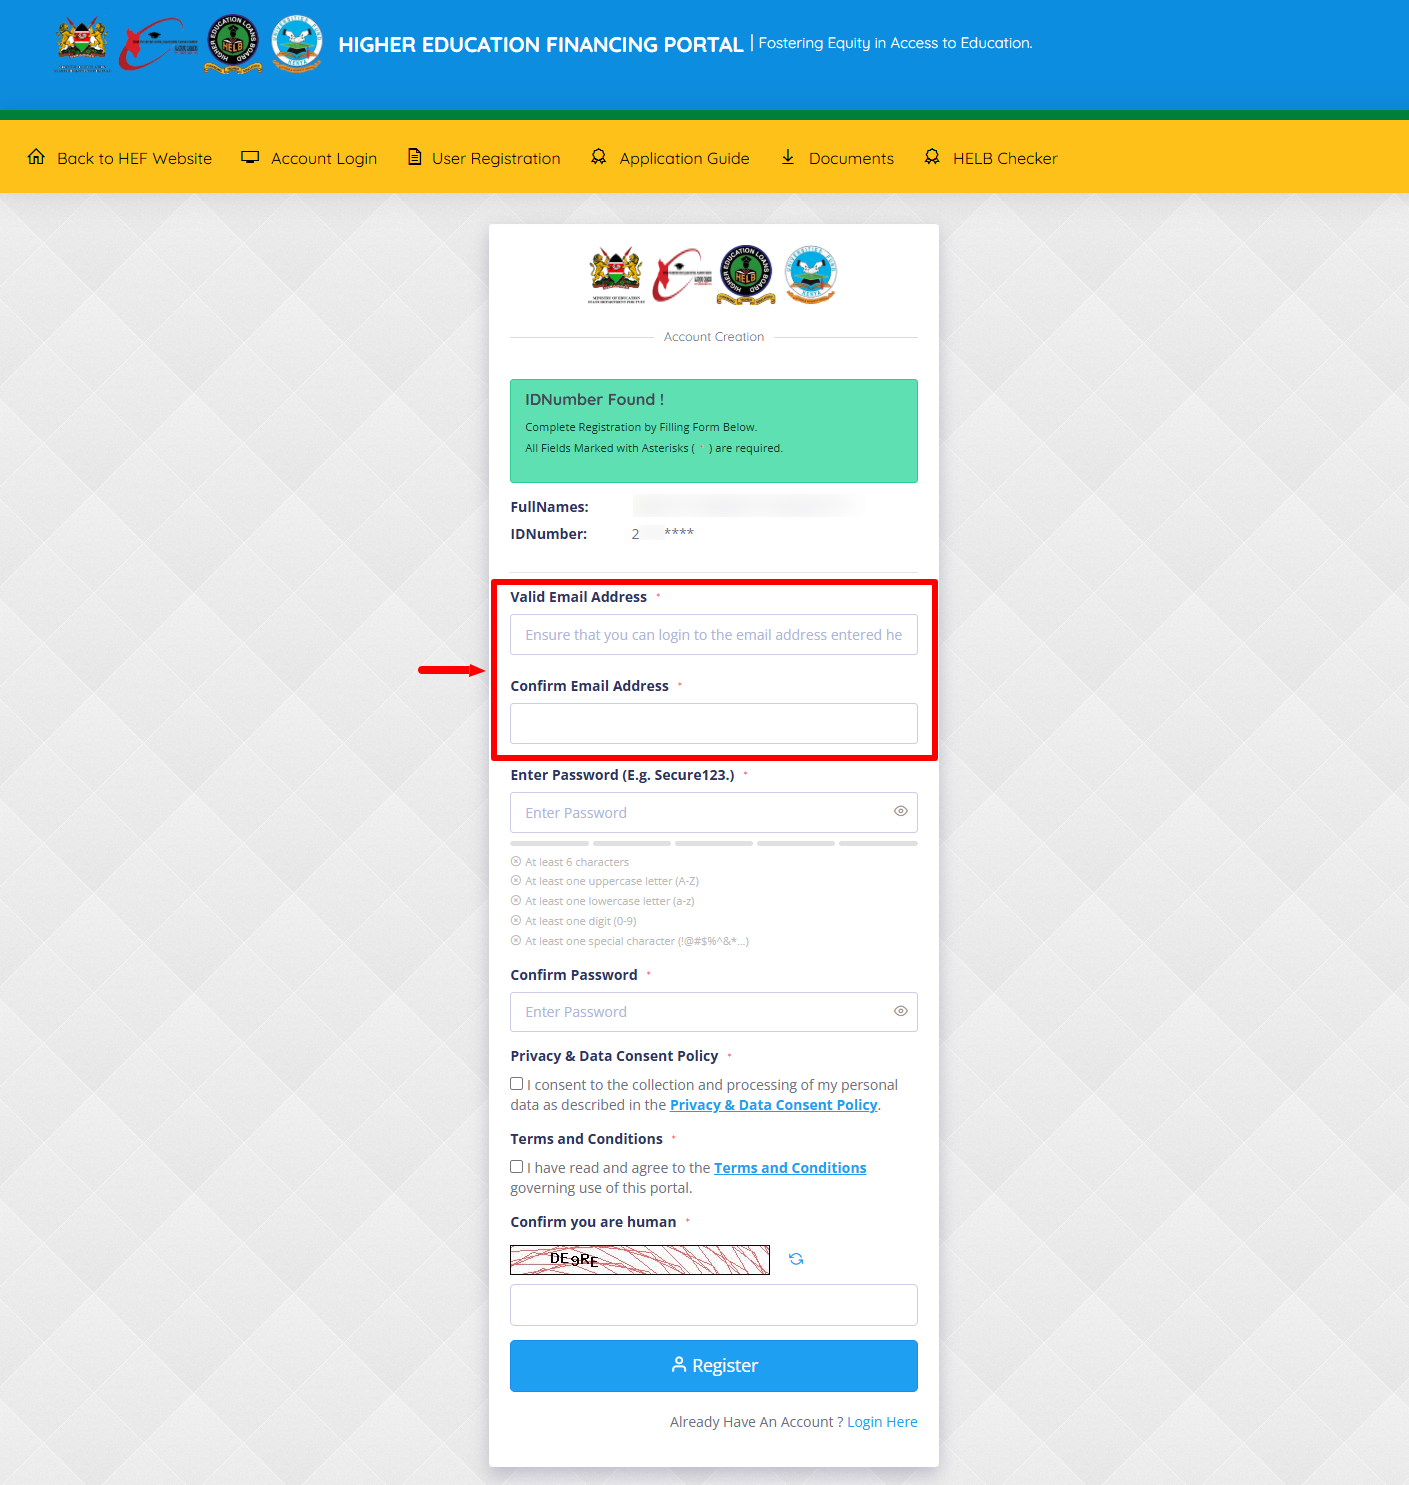
Once your details are validated successfully, in this step you now need to enter “Email Address” that you want linked to your HEF Portal account. Enter a valid email address and confirm the same before proceeding to the next step.
- Step 12: Enter Password
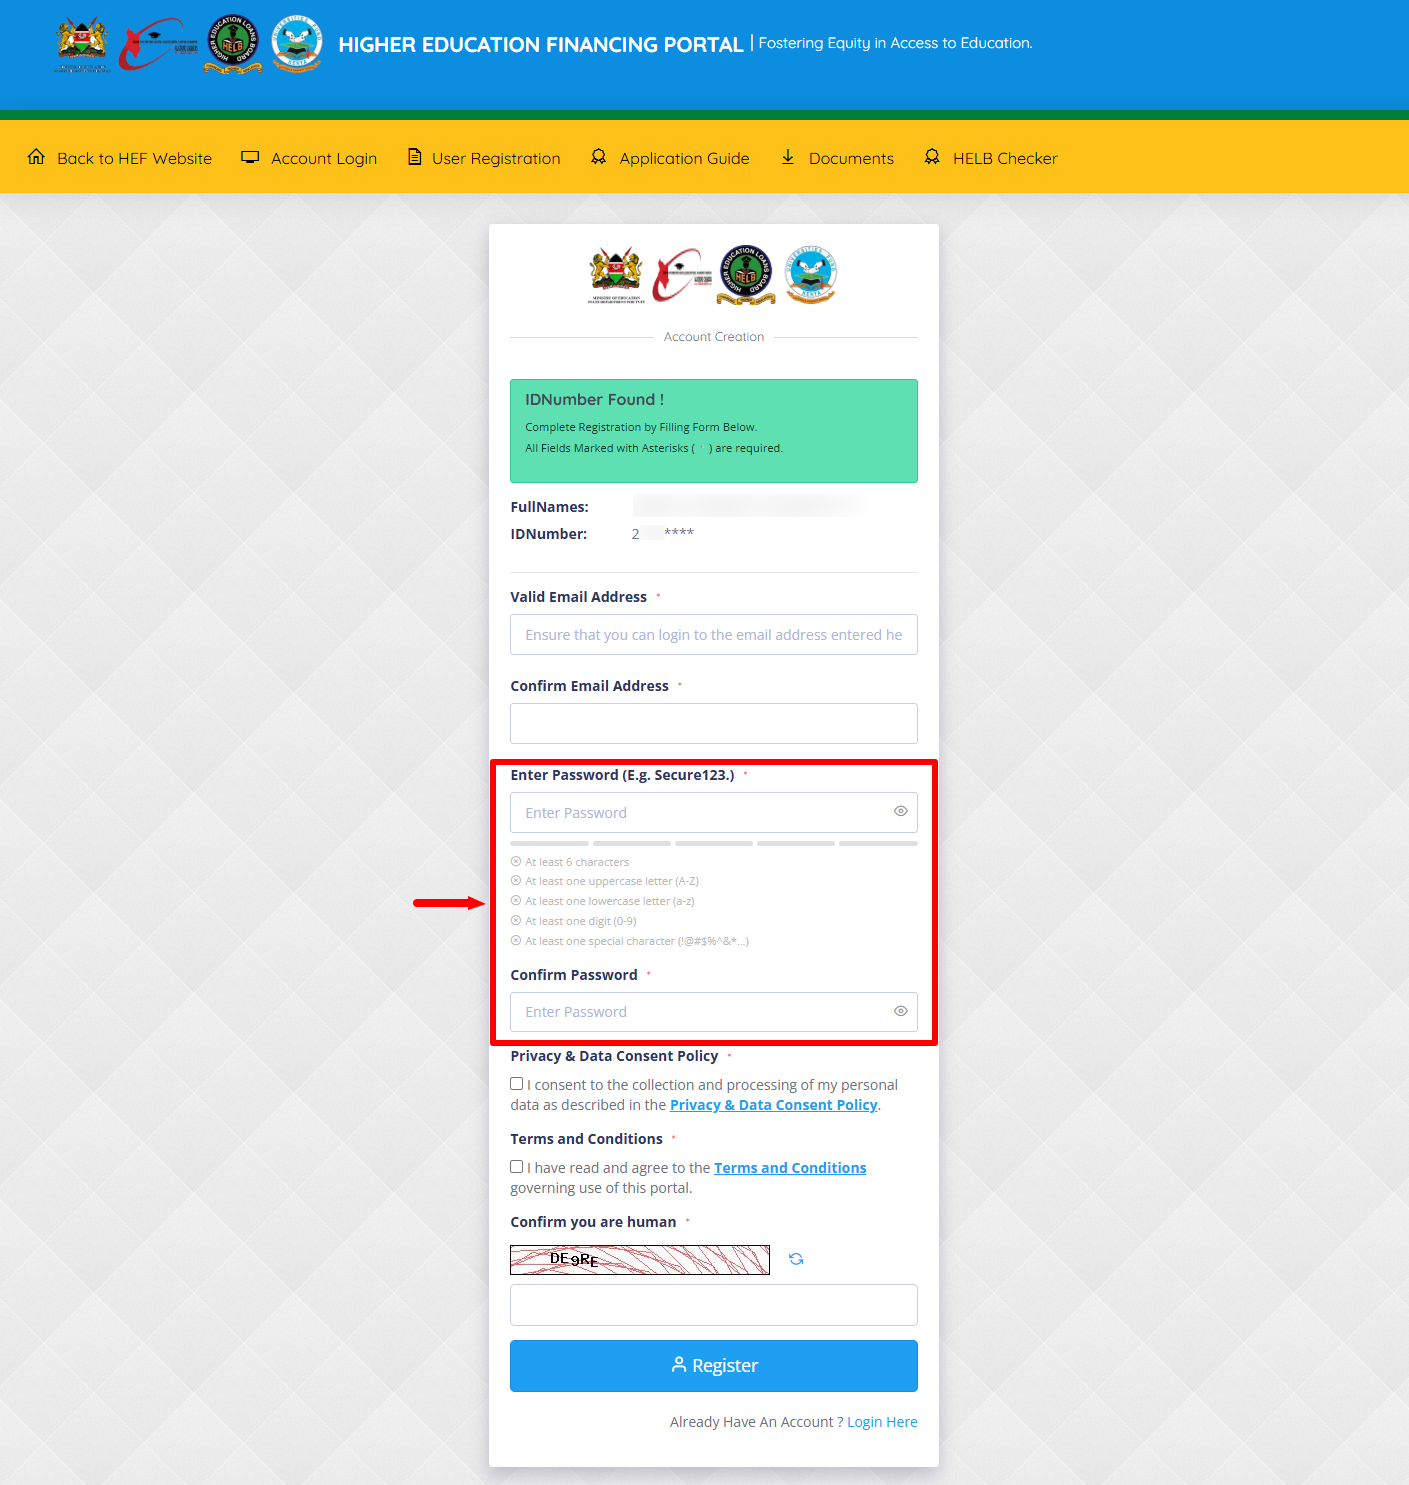
In this step, you need to enter “Password” that you want to use to log in to your HEF Portal account and also confirm the same. Your HEF Portal Password must have: at least 6 characters, at least one uppercase letter (A-Z), at least one lowercase letter (a-z), at least one digit (0-9) and at least one special character (!@#$%^&*…).
- Step 13: Agree to Privacy and Data Consent Policy
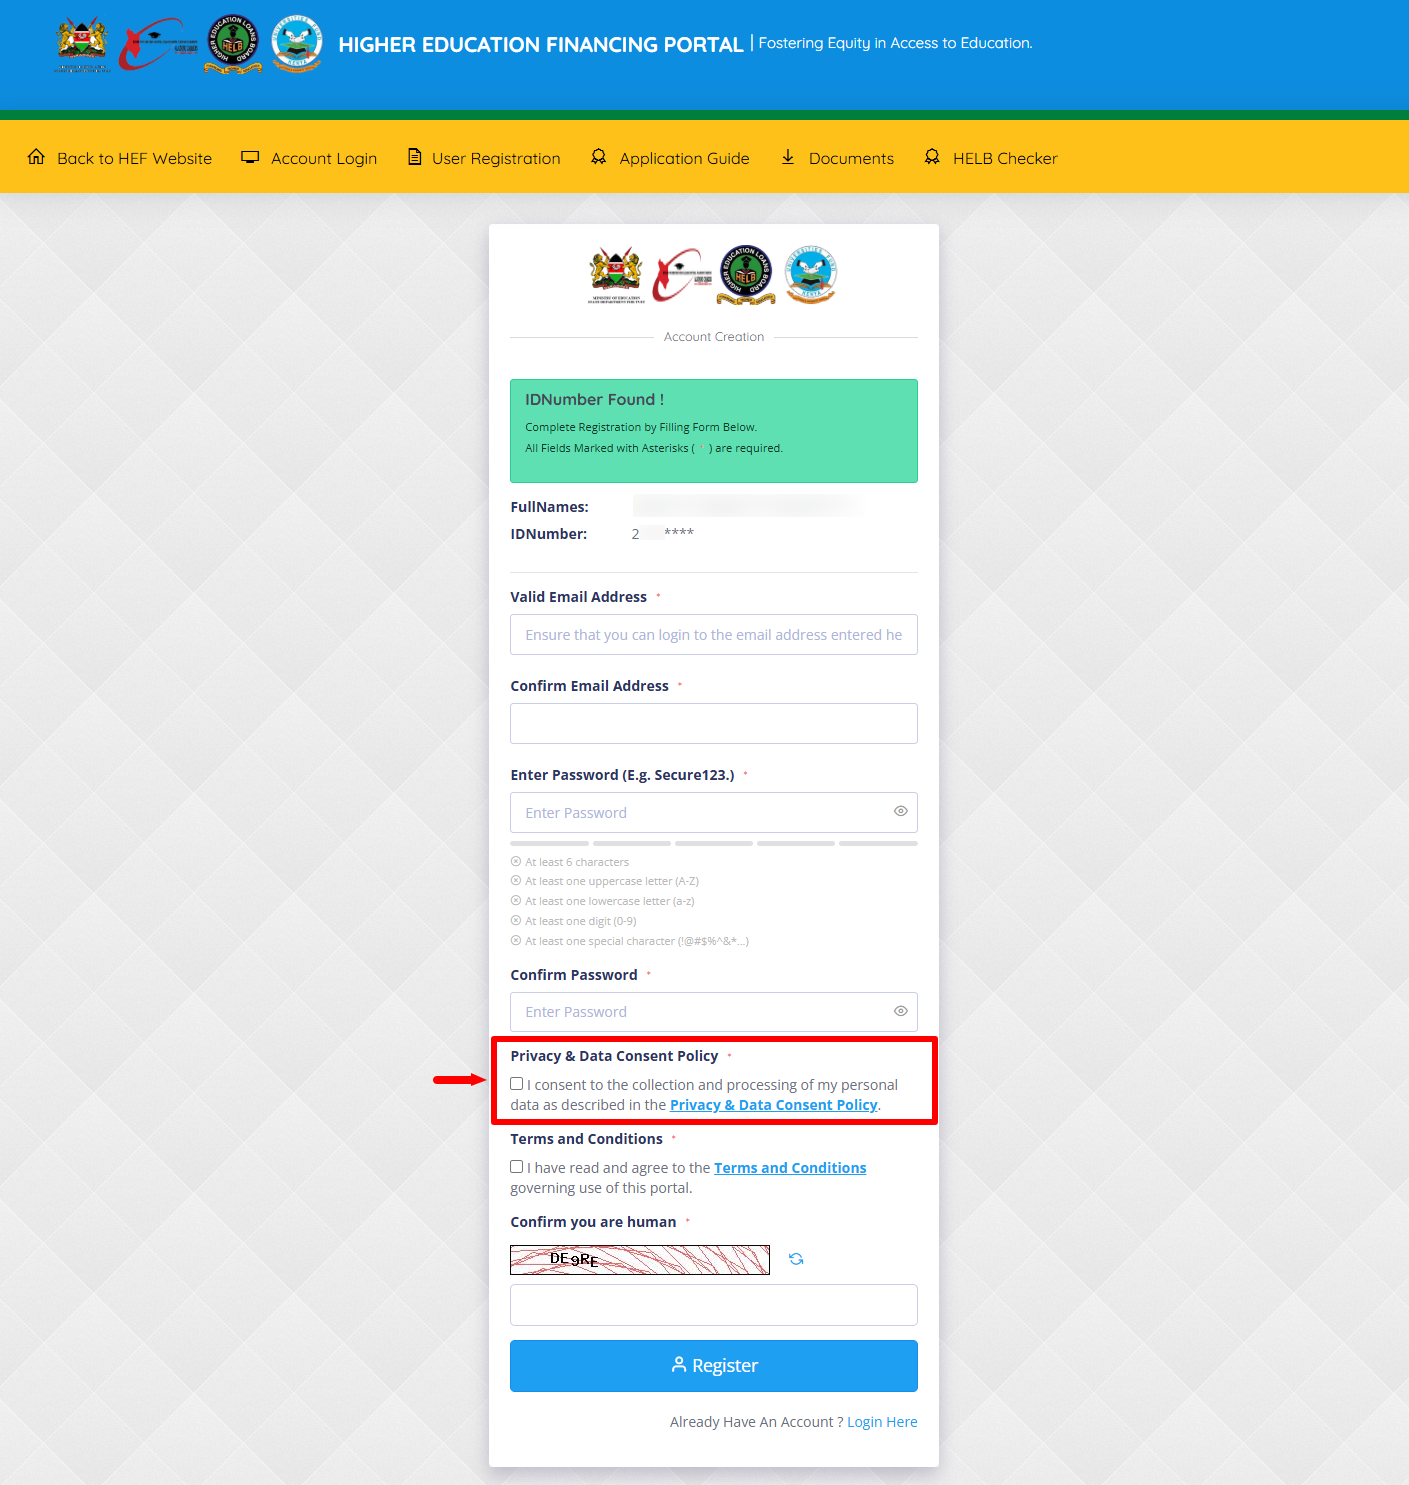
Next, you need to “Agree to Privacy and Data Consent Policy” by checking on the respective checkbox.
- Step 14: Agree to Terms and Conditions
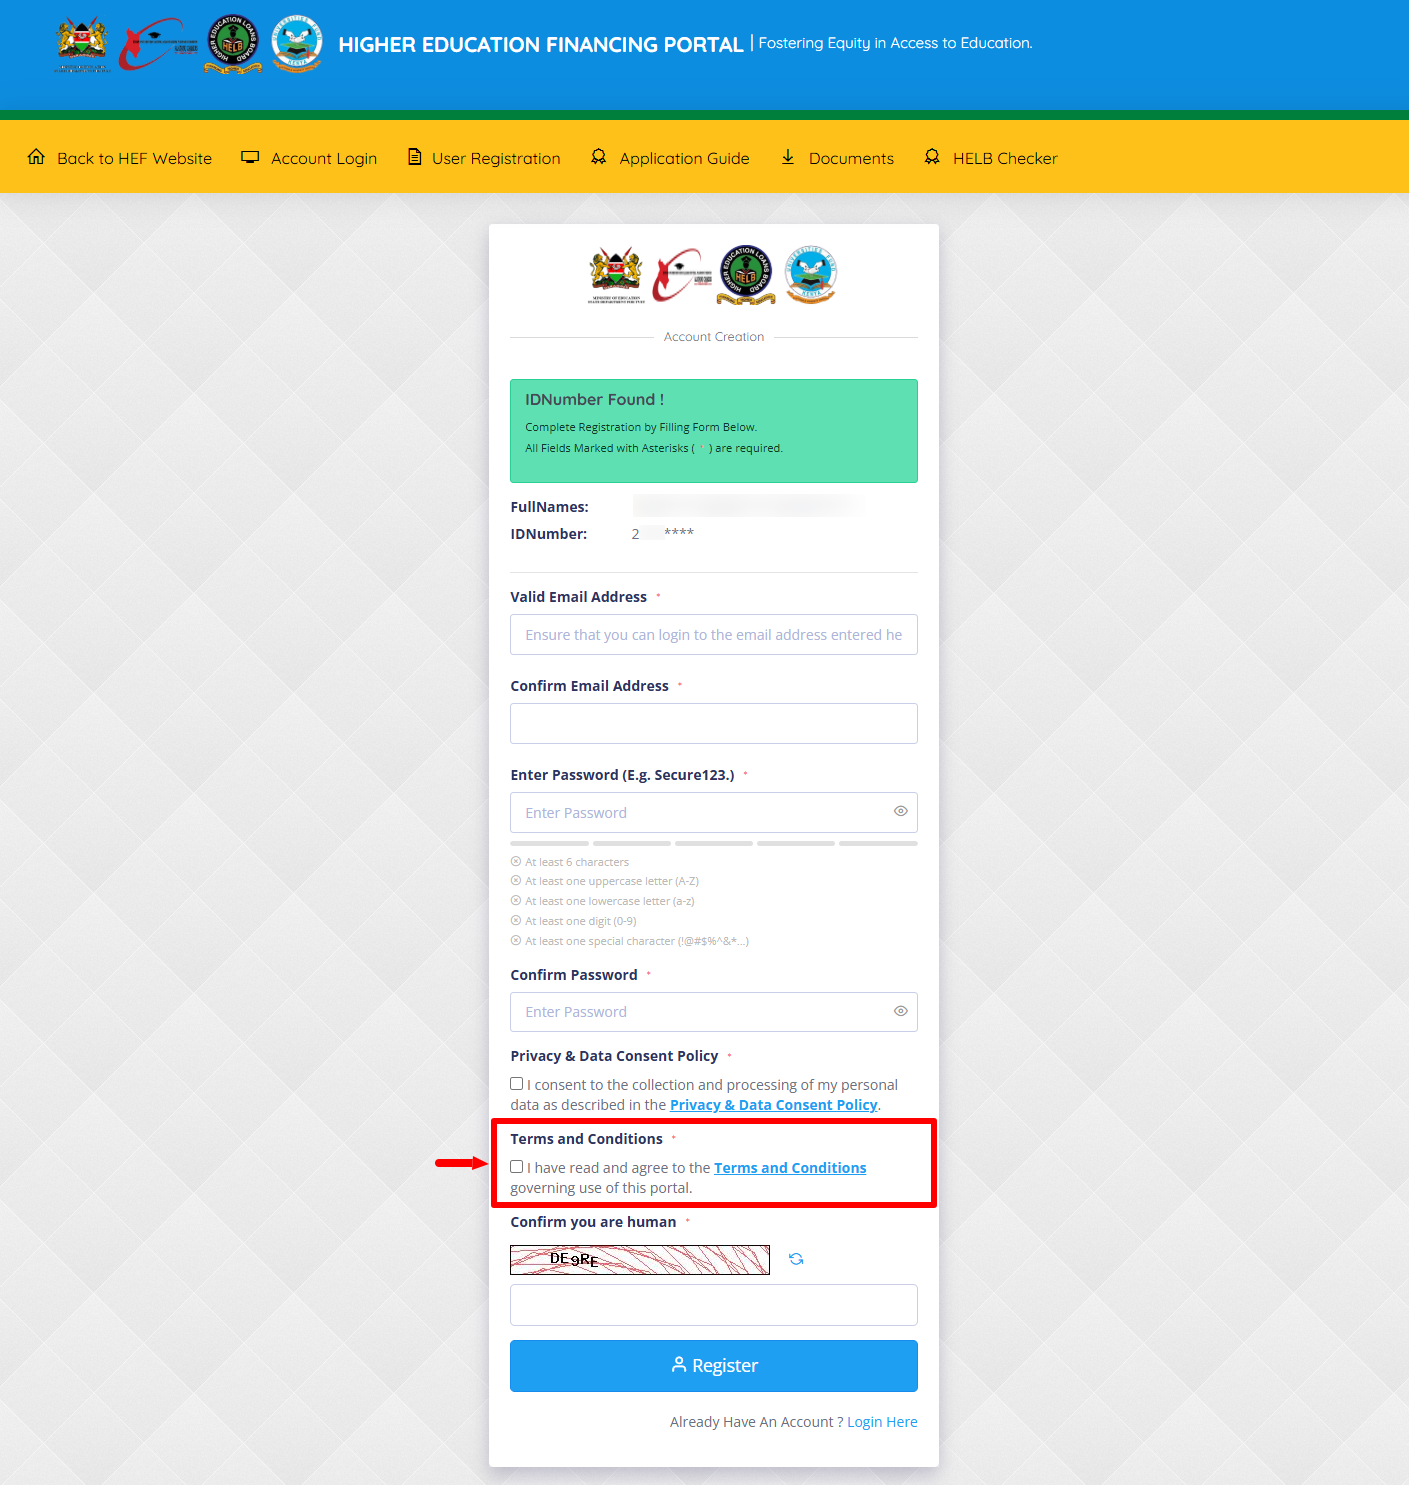
You also have to “Agree to Terms and Conditions” by checking on the respective checkbox.
- Step 15: Solve the CAPTCHA Challenge
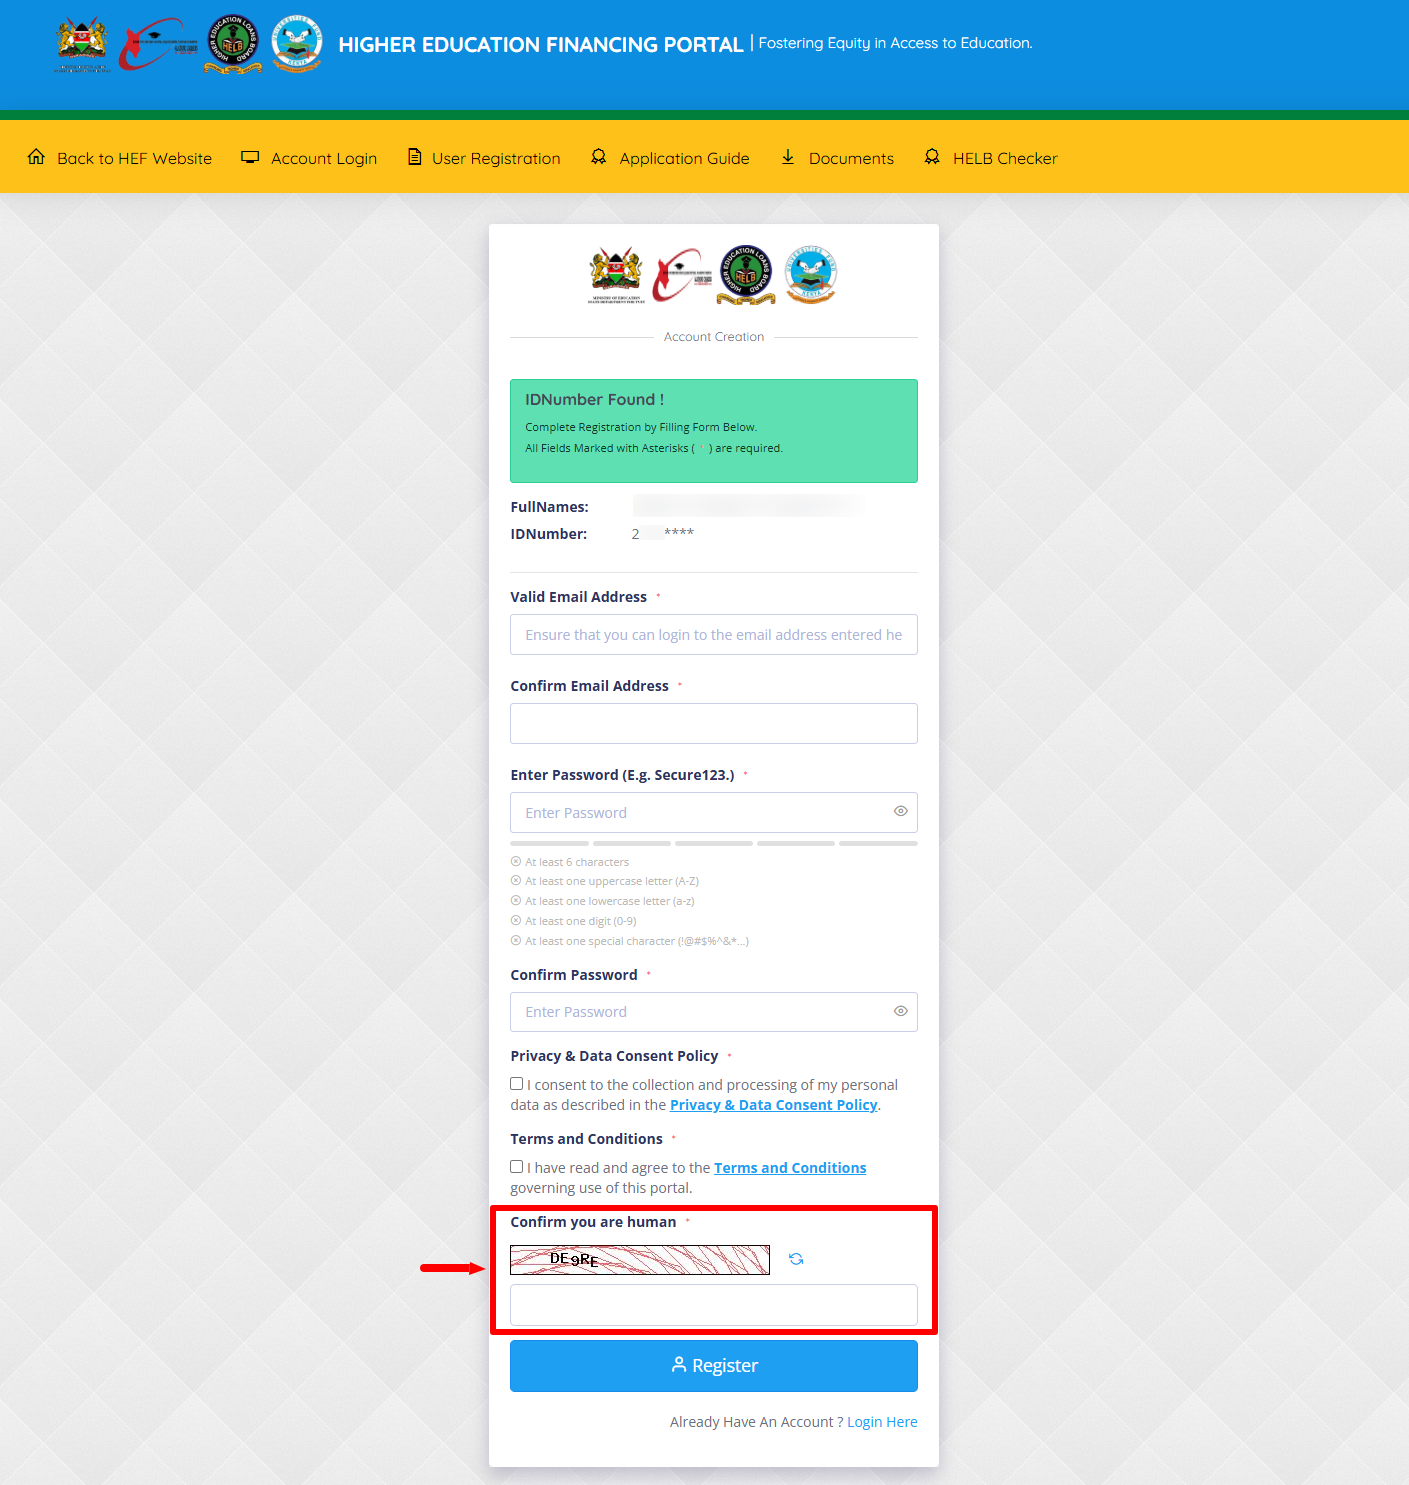
Once you have agreed to the Privacy and Data Consent Policy together with the Terms and Conditions, proceed and solve the CAPTCHA challenge.
- Step 16: Click on Register
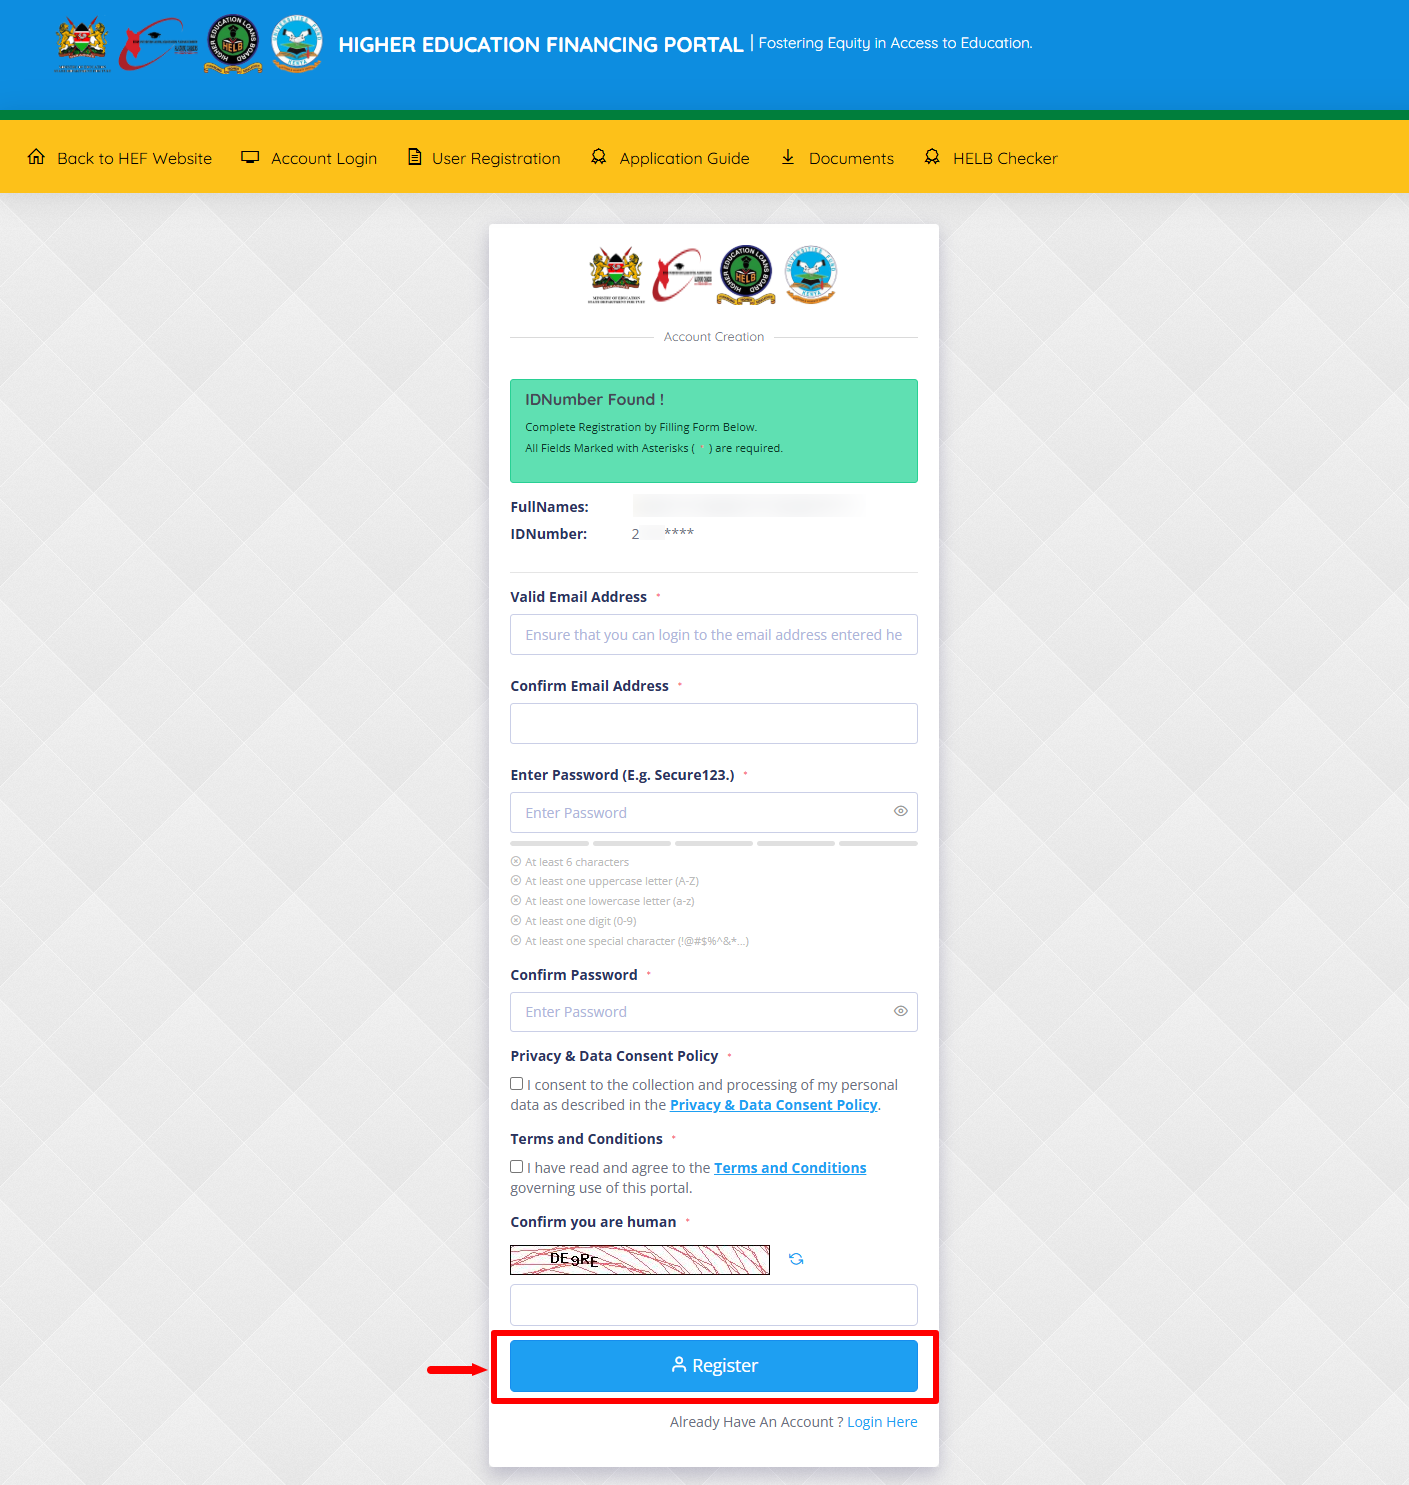
In this step, once you have filled in all relevant fields on the HEF Portal Registration form, click on the “Register” button.
- Step 17: Email Activation
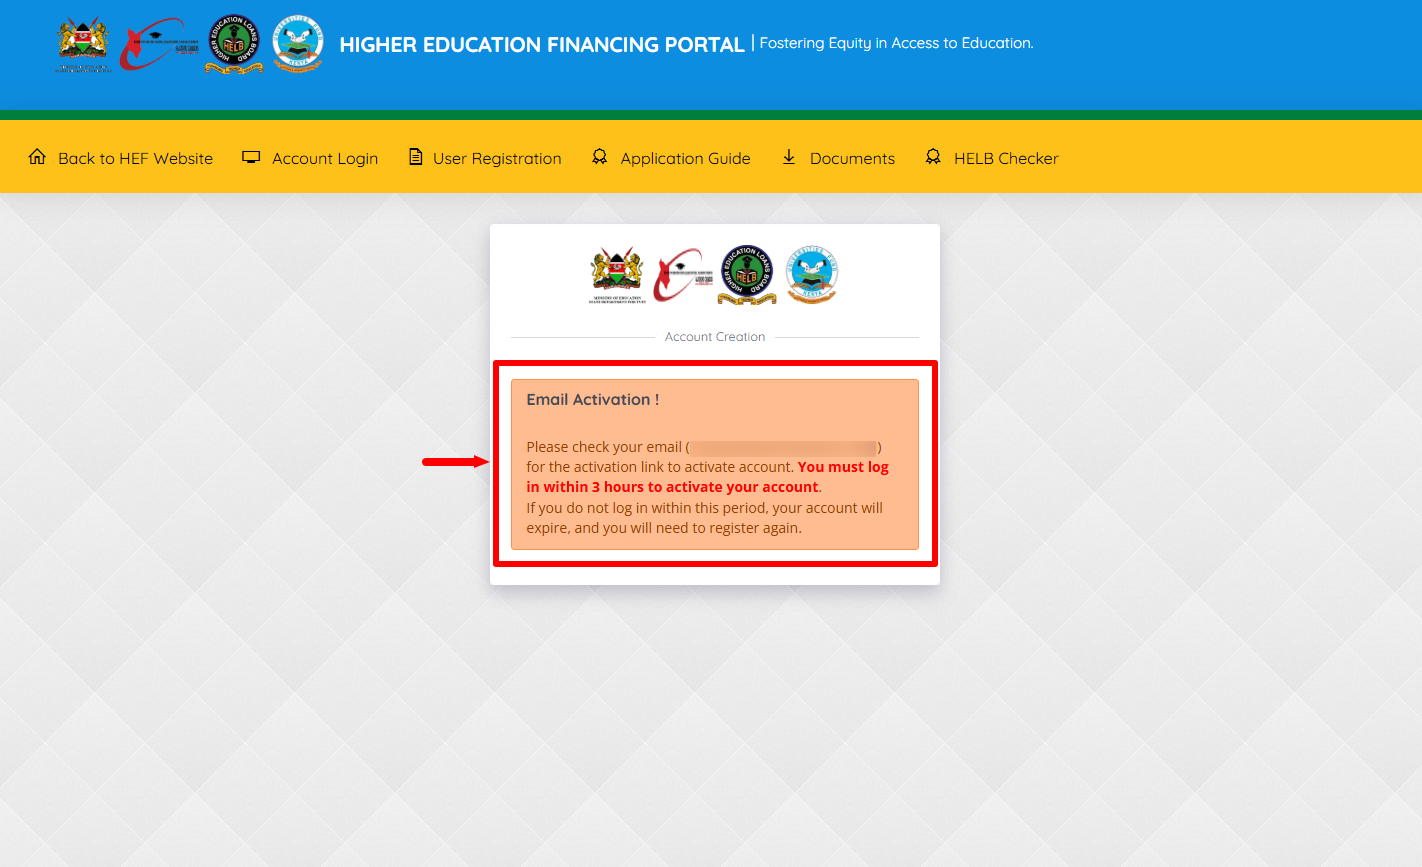
Next, check your Email for the HEF Portal Activation Link. You need to click on that link to activate your new HEF Students Portal account. You must log in within 3 hours to activate your account. If you do not log in within this period, your account will expire and you will need to register again.
- Step 18: HEF Portal Account Registration
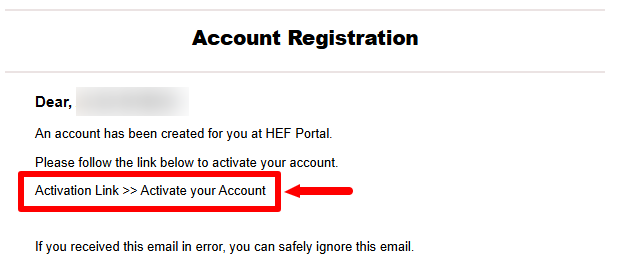
In this step, you need to click on the “Activation Link” so as to activate your HEF Students Portal account.
- Step 19: HEF Portal Account Activated
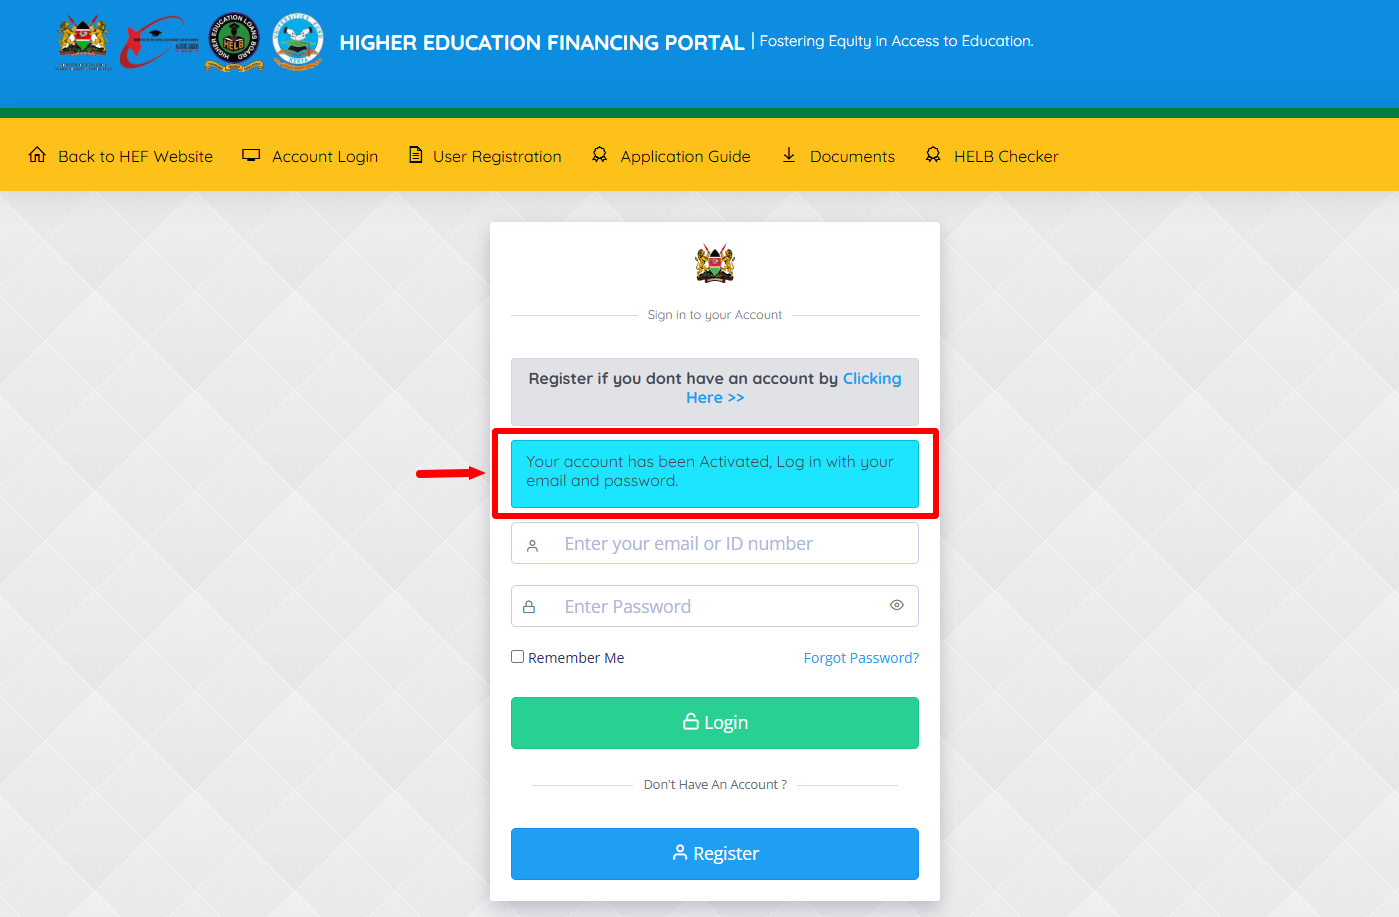
Once you click on the Activation Link, your HEF Portal account will be activated and you will see this message – “Your account has been Activated, Log in with your email and password.” Once you login, you will have to verify your phone number to complete the HEF Portal Registration process.
- Step 20: Provide Valid Phone Number
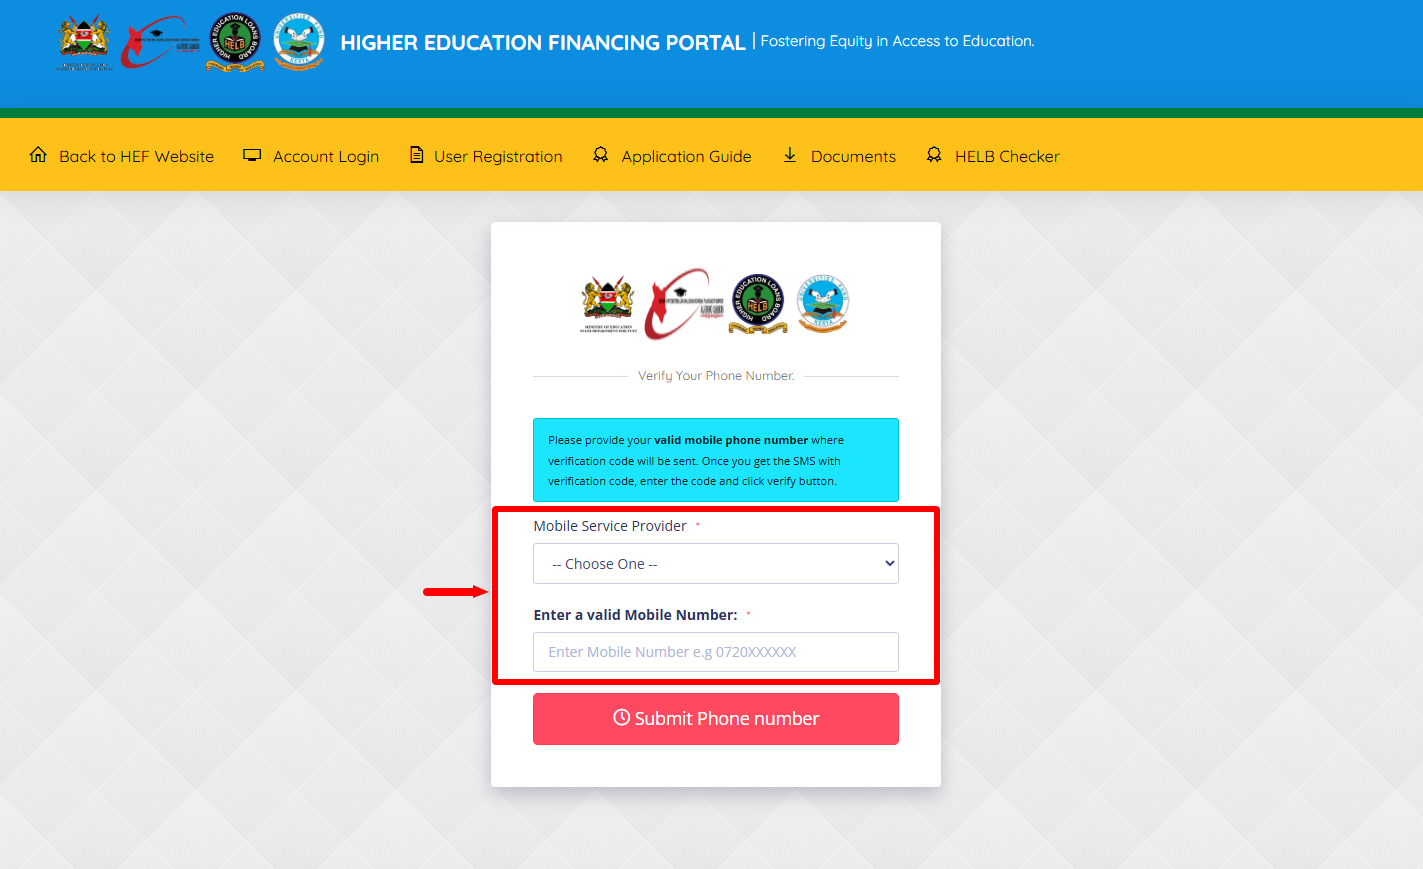
In this step, you need to provide a valid phone number where verification code will be sent. Select the mobile service provider i.e. Safaricom or Airtel, enter the phone number and click on the “Submit Phone Number” button.
- Step 21: Enter OTP
Once you get the SMS with verification code, enter the code and click “Verify” button.
Overview: HEF Portal Registration
To register on the HEF Portal, start by visiting the HEF Portal and clicking on Register. Select your employment status and choose whether to use your ID Number or Maisha Number. If you select a KCSE year from 2022 to 2025, you will be required to enter your KCSE Index Number, followed by your ID Number and First Name. Select the appropriate Type of ID Card and click Validate to proceed with the registration process.
READ ALSO: How To Update HEF Portal Email Address
Next, enter your Email Address and create a Password for your HEF Portal account. Agree to the Privacy and Data Consent Policy and the Terms and Conditions, then solve the arithmetic question provided and click Register. After submitting the registration details, check your email for the HELB account activation link and click the link to activate your account. Once the HEF Portal account has been activated, your HEF Portal registration will be successful and you can login using ID Number and password.